Be sure to sign up for the weekly RV Travel Newsletter, published continuously every Saturday since 2001. Click here.
Showing posts with label map. Show all posts

Thursday, May 26, 2016

OK Google, What Route Did I Drive to Tallahassee?

by Chris Guld, GeeksOnTour.com
If you turn on Location Services and allow Google Maps to save location history, it records everywhere you go – as long as your phone is with you. It also records the times and photos you took along the way. On an Android phone, you access this stored data by opening the Google Maps app, tapping the 3-line menu in upper left and choosing Timeline. Then select a day from the dropdown lists, and you will see where you went and what you did that day!
image

Turning it Off

Now, I know that some of you are a little creeped out by this! First of all, you need to know that this is for your eyes only. No one else can see this information unless they can log into your Google Account. I can’t even figure out a way to share this screen with anyone when I want to – you can’t. To get that picture above, I took a screenshot – it is just a static image.
If you still want to turn it off, just turn off location services for Google Maps.
  • Android: Open Google Maps App, 3-line menu in top left, Settings, Google Location Settings, Google Location History – turn off
  • iPhone: Open Google Maps App, 3-line menu in top left, Settings, Location History – turn off
You can also delete the existing location history that has already been recorded. See detailed instructions from Google Help.

Seeing Your Location History

There are slightly different techniques depending on what device you’re using:
On a Computer:
  • Go to Maps.google.com and make sure you’re logged in with your Google account
  • Click the 3-line menu in upper left
  • Click Your Timeline
On Android:
  • Open Google Maps App and make sure you’re logged in with your Google account
  • Tap the 3-line menu in upper left
  • Tap Your Timeline
On an iPhone/iPad – the Google Maps App doesn’t have Timeline yet on iOS
  • Open a Browser, preferable Chrome, but Safari also works
  • Go to Maps.google.com/locationhistory
I find this very handy to remember locations and routes. And, I love it for taking screenshots of maps with my route for putting in my Blog! For lots more info on what your smartphone can do with location information, see Episode 82 of What Does This Button Do? Location Services
What about you? Love it? Hate it? Found any practical use for it? Leave a comment.

Thursday, January 7, 2016

Measuring Distance with Google Maps

I’m always planning my travels and asking, I wonder how far it is from ___ to ___? Or, if we want to drive about 200 miles today, where does that get us? Google Maps is my tool of choice for anything map related and it can answer both of these questions.

To go from X to Y, is how many miles?

To ask that question, I use the directions feature of Google Maps. Tap the directions button imageto get started. On a computer, you’ll see that button at the top left of your screen next to the search box. On a smartphone, you’ll see it in a blue circle at the bottom right. On either one, clicking it will open up a From and To field. On your phone it assumes you want the “From” location to be your current location, but you can just tap on that and type somewhere else. On a computer, you can click the map to set a From or To location.
So, if I want to know how many miles it is from Essex Junction, VT to Ship Bottom, NJ, it will look like the screenshots below. Google reports that it is at least 388 miles.
Note: if we were using this to navigate, I would use exact addresses or locations, but just to get a ballpark I use city names.
On a Computer:
image

On a Phone:
image

If I go X miles, where am I?

388 miles is way too far for us to go in one day in our motorhome! We prefer more like 200 miles. We’ve been doing this a long time, and we’re lazy! The question I want to ask now is, “If we leave from Essex Junction and go 200 miles in the general direction of Ship Bottom, where are we? Google calls that “measure distance” and it does it with a straight line, so this won’t be accurate with turn by turn, it will be ‘as the crow flies.’ I wish I could ask, “following the route above, show me 200 miles from the start.” The only program I’ve ever found that can do that is Streets & Trips from Microsoft, and it has been discontinued. So I will make due with Google’s approximation.

On a Computer: Right click on your starting point and choose the option to Measure Distance. Now you can click another point and see the distance written next to the line that is drawn and also in the Measure distance dialog box that appears at the bottom of the screen.  You can drag that one point until you see 200 miles, or you can click to set multiple points and get a closer approximation to actual distance.
  image
On a Phone: You need to start from a pin. You get a pin to show by tapping on named location, or longpress anywhere on the map. Once a pin is visible, you will see a name for that location at the bottom of the screen, swipe up on that bottom area to reveal an information panel – at the bottom of the information panel, you should see a link to “Measure Distance.” Tap on “measure distance” and you will now see a black circle. You can’t drag the circle, you drag the map and the circle stays in the center. You can pinch and zoom the map and the bottom of the screen will report the miles represented. You gotta play with it a bit to get the hang of it. Once you got it, it’s easy. Both the computer and the phone report that a 200 mile straight line from Essex, lands us somewhere between Kingston and Beacon, NY. Knowing that the true distance will be longer than the straight line, I’ll start looking for campgrounds in the vicinity of Kingston.
  image

 This article is by Chris Guld, of GeeksOnTour.com. To learn more about using Google Maps and many other programs of use to travelers, visit her website and consider becoming a member in order to view all the tutorial videos.

##RVT786

Wednesday, December 23, 2015

Make your Travel Map for 2015

I love having an easy to see overview of all my travels for the year. I’ve made one for every year that we’ve been RVing.
It started out as a simple graphic with a line to represent our travels, Then I started using Streets and Trips and taking a screenshot.
Then Google Custom Maps came along, now called Google My Maps. It’s free and really quite easy to make a map with lots of detail.

Samples of our Travel Maps

2004
2005
image
2010
image
2011
image
2013
image
2014
image

It has gotten more sophisticated over the years. Now, with the free Google My Maps, I can see the overview, but every marker is clickable and I can have pictures, videos and text that you see when you click a marker. You can see all 11 of our yearly maps on our Blog’s Map page.

2015 Travel Map

Here is our map for 2015 … over 10,000 miles in the RV, plus trips to Europe, Bahamas, and Cuba! If you click on the picture below, it will take you to the full map, then try clicking on individual markers – like Madison, Wisconsin, or Cienfuegos, Cuba. You will see photos and perhaps links to blog posts. What a fabulous way to record all the details of your travels in one place!
image
Now, using Google My Maps, every marker can tell a story.

How to Make a Map

To use Google’s My Maps, you start with the regular Maps.Google.com. It’s best to use the Chrome browser, but not essential. What is essential is that you must be logged in to your Google Account. Check the upper right corner of your screen and see the circular icon – usually your face – that represents the account. If it’s not you, or it says, “Sign In” then click there and sign in with your Google account. Then click the 3-line menu, and then My Maps. You will then be able to open one of your existing maps, or create a new one.
image

Once you’re there, you’ll see a little toolbar.
image
To make a marker, you click on the 4th button over – the marker tool – then click the place in the map where it goes. That will open up a dialog box where you can add further information about that spot. To draw a line, you use the next button over, then drag on the map to create the line.
Your map is being saved automatically as part of your Google Account. There is also help available on the same menu.

Planning Ahead

Google My Maps is not the only way to do this, we like using the Roadtripper.com app and website to sketch out our plans.
image

Show us your 2015 Map!

Where did you travel in 2015? If you have a map, please leave a comment with a link so we can see! And, let us know what program you used.

Thursday, September 17, 2015

Mapping and Sharing Your Travels with Google My Maps

by Chris Guld at www.GeeksOnTour.com

At the recent FMCA Convention in Madison Wisconsin, we taught a seminar on Google’s My Maps. After the seminar we had a great conversation about making maps with Bob Weithofer who attended the seminar. He ended up sending me a link to a map he made just for his family along with an email that said:

We use Google Maps as a way to keep our family informed of our plans for the year. The places we have been are shown in the standard red tear drop marker. The places we are going to are shown as a star. Each location is numbered so they will know what order we are visiting these locations.

They can click on the marker and get the dates we will be at the campsite and possibly some information about why we are there. They can click on the star and have the physical address, phone number and website of the locations where we are and where we plan to travel. This is because I search for the location of the campground on maps and added it to my map. They also get the table on the left side. Finally, they have access to the photos we've attached.

The Big Picture view of Bob’s Map:

image


A more zoomed in view of Bob’s map, with the legend in the left sidebar.

image


This is Great! I’m always so happy to see that the topics we teach really DO have practical application for other people, and I learn things in the process as well!  Bob creates this map using Google My Maps, then he shares it with family members and any one else who he wants to know his whereabouts. The red markers are his actual stops, the places marked with a star are planned stops yet to come. The lines in between are just placeholders where he stores the mileage between stops. Each marker is numbered in the legend at the left, so his family knows what comes next. Each marker is clickable. When it’s clicked it pops up a dialog box that may contain the dates of the stay, the details of the location, and maybe even some photos of when they stayed there.

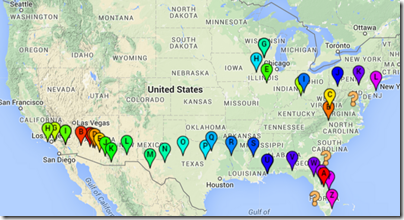
Geeks on Tour’s Map of 2015 travels:

image

I create our travel maps in much the same way. The image above is our map for 2015. You can see all 12 of our annual RVing maps by viewing the Maps page of our blog. If you look closely at our map you will see two A’s. That is both because we have more than 26 stops, and because I made one “Layer” for our winter locations and another for summer. The third layer shows in ? icons because we have yet to go there. When we do go to a planned stop, I move it from the “Planned” layer to the “Summer” layer (something I learned from Bob!) Clicking on any point on the real map, will pop up some descriptive text and maybe some pictures.

Sharing Your Map

We’ve shared our maps publicly, so we can put them on our blog, but you don’t have to. Your map can be completely private, or you can share with just specific people. When you’re editing your map, you will see the option for Share at the top left – at least that’s where it is today Smile They keep moving it! You can copy a link to send to anyone you want to see your map, or you can invite someone to collaborate and edit your map by entering their email address, or you can make it public. If you do nothing, it is a private map.

There are many other uses for My Maps, e.g.

  1. A list of places in the world where you want to visit
  2. A map of all the National Parks with one type of marker for ones you’ve visited and another for ones you haven’t
  3. A map of all the places you’ve lived
  4. A map of where your ancestors came from

To use Google’s My Maps, you start with the regular Maps.Google.com. It’s best to use the Chrome browser, but not essential. What is essential is that you must be logged in to your Google Account. Check the upper right corner of your screen and see the circular icon – usually your face – that represents the account. If it’s not you, or it says, “Sign In” then click there and sign in with your Google account. Then click the 3-line menu, and then My Maps. You will then be able to open one of your existing maps, or create a new one.

image

image

There is also help available on the same menu. If you are a Geeks on Tour member, here is a list of some of our tutorial videos just on My Maps:

  1. Creating Custom Maps #328
  2. Adding Pictures to Custom Maps #329
  3. Viewing and Sharing Custom Maps #330
  4. Custom Maps (My Maps) Drawing Lines #377
  5. Import Placemarks from Spreadsheet #379
  6. Import POI Data Set to My Maps #380

I’m so glad that Bob shared with us how he uses Google’s My Maps. If you use My Maps, please leave a comment below and tell us how you use it!

Thursday, April 16, 2015

Google’s My Maps and Custom POI Files

I’ve written about Google’s My Maps in this blog before. As much as possible I am now using Google’s My Maps for planning, and recording, our travels. Something I like to see when working on a plan is the location of all our Thousands Trails membership parks.
Below is a screenshot of what it looks like on my phone. Each brown square has a TT for Thousand Trails. This is stored in a ‘layer’ on my map and I can turn it on or off at any time.

image

I got this data from the Discovery owners website. I used the Google earth format.
You can also create your own data set using Excel. For example, here's a list I made of all the presidential museums – we’ve visited every one of them! Notice I did not even enter a complete address. Since this information is being imported to Google Maps, it can find the place based on the name and the city. Of course, the more detail you provide, the more accurate the markers will be.

image

Once the data is imported to your map, you can even personalize the icons and make the labels visible.

2015-04-16 19.40.45

To make a new map and import a data file in My Maps:

  1. Go to Maps.Google.com on a computer browser – preferably Chrome.
  2. Click the empty search field and you should see My Maps link appear. Click on that and then Create.
  3. Under a new Untitled Layer, you will see a link to Import. Click that and navigate to the file of data you want to import.
  4. Depending on the file format, it will ask you which column(s) contain the information for the location of the marker. In the Presidential Museums example above, that would be both columns. Next, you will be asked which column contains the name or label for the marker. In this example it would be the first column with the name of the President.

There is a lot to learn about using Google My Maps. If you are a member of Geeks on Tour, there are several tutorial videos on My Maps. If you want to join Geeks on Tour, you can use the coupon code: rvtravel for a 20% discount.

Friday, February 6, 2015

See the Road with Google Maps Street View


by Chris Guld, GeeksOnTour.com

You know about Google Maps Street View right? That’s where the little Google car with the 360 degree camera on top drives down the road taking photos as it goes. The result is added to Google maps so you can feel like you’re actually there, not just looking at a map. What you may not know is how to see that view using your smartphone or tablet.

The key is to be able to open up the info cards on a specific place. For example, if you’re zoomed in on the map near Golden Gate Bridge, you’ll see a place called Fort Point. Tap on that and you see an info card for Fort Point appear at the bottom of your screen. If all you see is the name, you can swipe up on your screen to reveal the cards. Then, you should see a picture for Map View. Tap on that and you’ll be looking at the 360 degree photography for that place.

2015-02-06 11.12.10
But, what if the place you want to look at is not a named place on a map? It’s just a spot on the road? Then, the trick is to drop a pin. Just touch and hold at the spot you want to see. When you see a red marker appear, you can tap on that marker to reveal the info cards at the bottom. If Street View is available for that spot, it will be one of the cards you can tap on.


Watch our weekly show on Learning Smartphones and Tablets:www.GeeksOnTour.com/weeklyshow
 
For more info on using Google Maps on mobile devices, See Episode 26, where our Beginner’s Lesson is on Google Maps. Here is a direct link to the place in the Youtube video where we teach Google Maps on Android as well as iPad.

Friday, October 31, 2014

Make your own Google Maps with My Maps App

imageby Chris Guld, GeeksOnTour.com
We’ve been living in our RV on the road for 11 years now. Over that time, I’ve had lots of ideas of places I want to go! I’ve also had lots of methods of remembering them. I’ve had written lists in a notebook, I’ve used Evernote to keep travel ideas, I’ve entered posts just for myself in Facebook, I’ve sent emails to Jim hoping he’d remember these places, I’ve created a Streets and Trips file called Ideas, and I’ve used Google Custom maps on the computer.
Nothing worked for me.
Evernote was good because, as a smartphone App, it is always with me so I can quickly jot down a quick note whenever the mood strikes. But, I really want them to be viewable in place on a map. So I created a custom Google map with all my idea places marked. I failed at keeping that up though because that needed to be done on a computer and a web browser. I need something on my phone.
My Maps is now available as an Android App! Yay! I’m so excited! (Yes, I really am a Geek.) This means I can grab my phone at any time I have an idea, open My Maps and create a marker for any place I want to remember. You can enter your own name for the marker, as well as a description. So far, I don’t see a way to add photos – for that you need to use a computer.
image
Just longpress on the spot where you want a marker, then tap Next
image
Here you can add your own Name and Description to the marker and tap Save
imageFrom now on, there will be a marker in that spot. Tap the marker and you’ll see the name, tap the name and you’ll see the description.

  • App Name: My Maps
  • Author: Google
  • Price: Free
  • Available for Android (although I find a “My Maps” listed in the iOS App store, it’s just regular maps - not yet available on iOS)
www.GeeksonTour.com
Watch our weekly show on Learning Smartphones and Tablets:  www.GeeksOnTour.com/weeklyshow

Wednesday, January 11, 2012

A Map of Visited States

Would you like to have your very own map of visited states to put on your blog, facebook profile, or email signature?  It’s easy and free by going to http://epgsoft.com/.  Just choose ‘Create Map’ and ‘Visited States Map.’  You should now see a listing of all the states.  Check off the ones you have visited, then Create Map.

visited-states-menu


Make sure to select the Map Size and the File Format.  Then, when you click Create Map you will see:

visited-states-map


If you find that you’ve missed some states, or selected some by mistake, you can click the Back button on your browser to fix it, then click on Create Map once again to see the corrected version.  Once the map looks how you want it, you right-click on it and choose Save Picture As (or Save Image As – depending on your browser.)  Navigate to the folder where you want to store it and click ok.  Now the map is a picture on your computer that you can use like any other picture. 

How about the World?

If you travel the world and want to have a map of visited countries, check out http://douweosinga.com/projects/visited.  It works similarly to the visited states above except at the very end.  Instead of saving an image file, you get html code to put on a blog or website.  It also only uses one color.  I find for a world map that one color is better anyway.

 
visited 83 states (36.8%)
Create your own visited map of The World or Like this? try: Eddie the DJ

This tip brought to you by Geeks on Tour

Geeks on Tour is a membership website with hundreds of Tutorial Videos on topics of interest to travelers, such as managing digital photos with Picasa, Route-Planning with Streets and Trips, and sharing your travels with a website using Blogger or with friends on Facebook. You can subscribe to our free enewsletter, or become a paid member and be able to view all of the videos in the Learning Library.